I decided to do a workshop at Dillington House in Somerset with Ron Frampton since it corresponded with the subject of this People and Place module. Ron is an extremely accomplished photographer (he has a Fenton medal from the RPS) who photographs the people and the landscape of the area in which he lives which is just south of the Blackdowns; I live on the north side of the Blackdowns, an Area of Outstanding Natural Beauty.
The course dealt with three disciplines; portrait, architecture and landscape. Ron gave us notes for all these, a page of salient points for each discipline. The nuts and bolts of photography! I find them necessary; if one wants to break the rules in the interests of creativity, it helps if one knows the rules first.
Ron's guidance helps one to achieve a pleasing image as can be seen in the image below.
 |
| Marion : model ! |
In making this Black and White image, I used a digital camera (Canon 5D mark 11) with RAW capture and a profile I have made for the camera with the relevant ISO. After processing the colour image in Lightroom, I applied the black and white mode and used the colour filtration to emphasise the different tones, in particular that of the model's skin. Finally, using Levels in Photoshop, I gave the image a final tweak and a slightly warm tone.
Ron asked us to sign a form to say that we would not use photographs of the models in anyway without first seeking permission; this was a good reality check. Although we did have to pay for the models, we did not pay enough to grant us public use.
 |
| A black and white image : a lot of work was done to present a pleasing array of tones and make sure there was detail in the darker background. |
However, during the first session I did some modelling and after requesting use of a photo of Marion, Ron with Marion's consent granted me limited usage as well as a short private session with the model in which I photographed her against the Ham stone of the Dillington buildings. This resulted in the following image that is a composite of two photographs, the other one being of a toilet roll; the two have been blended and some filtration applied.
 |
| I call this Lulu; constructed for an OCA competition |
Someone commented that this image has "narrative possibilities"; I agree but at this point do not wish to suggest what those narratives might be! It was partially inspired by Magritte and pre-visualised to a certain extent.
We also photographed another model, Brendan Bruelan, a young man in his early thirties who is about to set out as a professional photographer. The agreement signed during the workshop prevents me from using any of these on my blog
In the afternoon, we photographed the models running past with the house in the background; one really needed to get the exposure right as well as pre-focusing.
Ron's workshop was very much about getting down to the basics of photography and tripods were in use all the time which certainly helps to create sharper images. In these days of higher ISO speeds and Image Stabilised lenses, tripods are often forgotten and quality suffers. We also used manual focus and I switched off the Image Stabilisation as it can interfere with the image; Live View in which one can blow up a certain area of the image certainly helps a lot with focusing. An electronic cable release was further used to avoid camera shake.
On the sunday morning, we went out to photograph a church nearby. The mid-morning light was streaming in from one side rather than from behind us which gave added texture to the building. There was however a Yew tree to the left side, the tones of which might well present a problem particularly in black and white; Ron however reckoned there was enough light on it to prevent this happening. Ron advised us to focus on the nettles in the foreground which was an interesting suggestion ... it aimed to avoid blurry vegetation in the foreground!
Ron suggested we bracket our shots and that digital, owing to the tendency of highlights to blow out, might be best slightly under-exposed. This is a debatable point since other photographers suggest that exposing for the highlights is the right way to go as the highlights contain more information that lower tones! Of course, one needs to be careful not to loose any values but even with a few "blinkies" on the LCD screen, values can be contained owing to the larger colour space available in processing (for Lightroom this is a form of ProPhoto RGB).
Photographing inside the church was possible and on Ron's suggestion I made the following image ...
However, it became clear that it was not possible to contain all the values or tones in a single image owing to the wide range in contrast between darker objects in the church and the bright light shining through the windows! Making a series of different exposures and then blending them in HDR seemed necessary ...
In the afternoon, we photographed the models running past with the house in the background; one really needed to get the exposure right as well as pre-focusing.
Ron's workshop was very much about getting down to the basics of photography and tripods were in use all the time which certainly helps to create sharper images. In these days of higher ISO speeds and Image Stabilised lenses, tripods are often forgotten and quality suffers. We also used manual focus and I switched off the Image Stabilisation as it can interfere with the image; Live View in which one can blow up a certain area of the image certainly helps a lot with focusing. An electronic cable release was further used to avoid camera shake.
On the sunday morning, we went out to photograph a church nearby. The mid-morning light was streaming in from one side rather than from behind us which gave added texture to the building. There was however a Yew tree to the left side, the tones of which might well present a problem particularly in black and white; Ron however reckoned there was enough light on it to prevent this happening. Ron advised us to focus on the nettles in the foreground which was an interesting suggestion ... it aimed to avoid blurry vegetation in the foreground!
 |
| country church in colour |
 |
| country church in black and white |
 |
| the black and white image with less orange filtration |
Ron suggested we bracket our shots and that digital, owing to the tendency of highlights to blow out, might be best slightly under-exposed. This is a debatable point since other photographers suggest that exposing for the highlights is the right way to go as the highlights contain more information that lower tones! Of course, one needs to be careful not to loose any values but even with a few "blinkies" on the LCD screen, values can be contained owing to the larger colour space available in processing (for Lightroom this is a form of ProPhoto RGB).
Photographing inside the church was possible and on Ron's suggestion I made the following image ...
However, it became clear that it was not possible to contain all the values or tones in a single image owing to the wide range in contrast between darker objects in the church and the bright light shining through the windows! Making a series of different exposures and then blending them in HDR seemed necessary ...
This made it possible to record all the tones yet a lot of work needed doing to create the final image and a colour version just seemed too difficult. It would have been better if I had focused on the windows rather than on the prone statue as the window detail is the main centre of interest in this image.
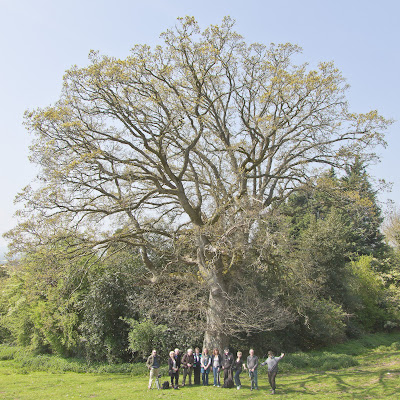
I made a final image of a large oak that stands below the church ...
 |
| Oak Tree : processing of this image worked to emphasise the blue - green contrast |
 |
| This image also became the setting for the group photo that I made with a timed release having just enough time to make it from the camera to the group! |
 |
| A close up of the group in black and white ! |


